Since I sometimes write about software in this blog, I want to occasionally introduce programs that I personally find helpful and that other readers may also find useful. This post is about Pluckeye. Pluckeye is software that can filter and block websites with pornographic or other explicit content.

This topic is close to my heart because I have been dealing with the negative effects of internet pornography for a long time from my own experience. Porn filters or blockers can be a good technical tool to reduce or completely stop porn use. I myself have a blog on the subject of porn addiction, but it is in German. I have also written a longer article on the topic of this blog post there. This article on the Pluckeye software is a translation of the other article, although I have adapted and updated some details.
If you are interested in learning more about porn addiction and the negative effects of internet pornography, please feel free to take a look at my book Overcome Porn Addiction [Amazon Affiliate Link].
Some words in German may appear in the screenshots and images in this article. This is because German is my native language and my computer is set to this language. I apologize for any inconvenience this may cause. However, all screenshots should be understandable to all readers.
Why Pluckeye?
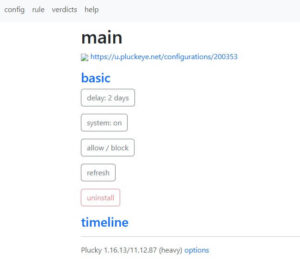
In recent years, there have been a lot of developments in the field of porn blockers and filters. While about ten years ago, the only real option for blocking internet pornography was the old blocker called K9, today there are many more to choose from. In my opinion, Pluckeye is the best filter for computers. You can download the software here.
I consider the Pluckeye internet filter to be the best choice because it is highly customizable and flexible. In addition, the filter is free, although you can make a voluntary monthly payment or a one-time donation. Unlike some other filters I have tried over the years, the software is almost impossible to bypass if you set it up correctly (we will learn how to do that in a minute).
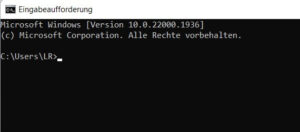
After installation, you can control the software directly via a browser extension (it works with Chrome, Firefox, Edge, and Brave browsers) or via the command prompt. I personally use the command prompt because I’ve gotten used to it and find it quite easy. You can find it in the Windows start bar or by typing cmd in the search bar and pressing Enter.
You can use the command prompt (cmd) to operate Pluckeye…
… or with the browser extension
In the explanations in this article, I focus on the commands in the command prompt. However, the extension in the browser is also quite simple and self-explanatory.
Level 1 or Level 2?
Some readers may have already wondered whether it is possible to simply uninstall the software to bypass it. This is a problem with many types of software designed to block explicit content. If I can install it, I can also uninstall it. However, this is not possible with Pluckeye for two reasons, if you approach it correctly.
First of all, Pluckeye has two levels. Level 1 is just the browser extension, which can be easily disabled or uninstalled. Level 2, however, applies to the entire system (the computer) and is very difficult to bypass. To activate Level 2, type pluck + system into the command prompt. When adding commands, this almost always starts with pluck +. Removing commands, on the other hand, starts with pluck –.
But there is also a second and even more important reason why Pluckeye is so safe and difficult to bypass.
Delay prevents quick uninstallation of Pluckeye
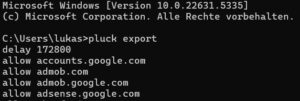
More importantly, Pluckeye works with a delay. You can only uninstall the software once this delay has expired. So if I have set a delay of 24 hours, I have to wait a day before I can delete Pluckeye. The delay is usually shown in seconds, but you can also use entire days. If you enter pluck delay 1000 in the command prompt, your system now has a delay of 1000 seconds. For a delay of one day, you would enter pluck delay 86400, and for one week (the maximum delay you can set), pluck delay 604800. However, there is an easier way. For a delay of three days, you can simply type pluck delay 3d. The d is simply the abbreviation for day.
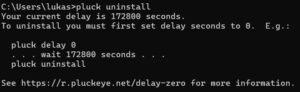
If you have set a delay, you cannot uninstall Pluckeye immediately
The delay affects not only the uninstallation of the software, but also which websites you can use. If I want to allow a site, I also have to wait for the delay. However, if I want to block a site, this happens immediately.
The developers of Pluckeye recommend using a shorter delay if you are not yet familiar with the software. Later, once you have made the necessary settings, you can then extend the delay to multiple hours or even days. I would agree with this recommendation. Otherwise, you may forget to unblock an important website, for example. And then you would have to wait a week to be able to use it. Right at the beginning and after installing the software, I would not use any delay at first (or, for example, not more than 5 minutes).
So much for the basic functionality of Pluckeye. It’s good to know that it’s difficult to uninstall or bypass this porn filter. In addition, the filter has a lot of other useful features. Unlike other blockers, Pluckeye can do more than just block porn sites.
Blocking and Allowing with Pluckeye
After installing Pkuckeye, some settings are already preset. For example, all images and videos on the Internet are blocked by default. It can be a benefit that you don’t have to block entire websites, but only images or videos. There are websites that you would like to use, but which may contain explicit images (e.g., search engines).
However, we can easily reverse the default settings. The command pluck clear resets all other commands. I should note here that the delay applies. The reset will therefore only take effect once the time delay has expired. I therefore repeat my recommendation that you should only use a long delay after you have set up the software.
The two most important commands are blocking and allowing websites. This is done with block and allow, respectively. Example:
Blocking: pluck + block google.com
Allowing: pluck + allow google.com
In the first case, you can no longer visit google.com. The second command allows the entire site. Incidentally, blocking takes precedence here. So if you enter both of the above commands, google.com is blocked. When you block a website, the change takes effect immediately. When allowing, you must first wait for the delay.
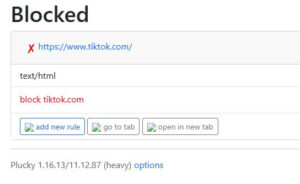
A website that is blocked with Pluckeye
If you want to undo a command, simply type minus (-) instead of plus (+). For example, you would type pluck – allow google.com. If I undo allow, this change is implemented immediately. If I undo block, the delay applies again.
pluck + allow google.com (Delay)
pluck + block google.com (happens immediately)
pluck – allow google.com (happens immediately)
pluck – block google.com (Delay)
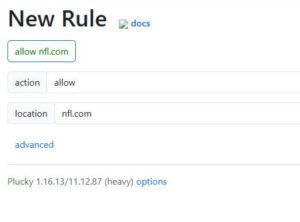
This is how you allow a website with the browser extension instead of cmd
You can also block or allow URLs and not Domains (I mentioned some of the differences in the article What is a subdomain?). For example, if I allow https://lr-apps.de/what-is-a-subdomain, I can use that page without any trouble, but not necessarily other pages from the same domain.
Blocking only images or videos
As I mentioned above, we can also block images and/or videos. Let’s look at the following example to illustrate this:
pluck + allow google.com
pluck + block google.com image/
pluck + block google.com video/
With these commands, the google.com site is allowed, but you cannot view images or videos.
You can of course block all images and videos, except for sites that you explicitly allow. To block all images and videos, write
pluck + block image/
pluck + block video/
If only these two commands are active, images and videos are blocked across the entire internet, but you can still visit the websites (although you will only see text). If you then allow a website, e.g. pluck + allow lr-apps.de, you can see images and videos on this site, but nowhere else. I already mentioned above that blocking images and videos is part of the default settings. So if you have just installed this porn filter, you don’t need to do anything else if you want to block images and videos.
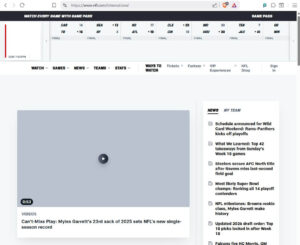
A website without any images
Overview of all commands
To keep track of all the commands you have entered so far, you can use pluck export to display the previous commands. With pluck future, you can see which changes will take effect after the delay has expired and when exactly that will be. However, this information is also available at the bottom of pluck export.
If you use pluck + block, you can gradually block unsafe or unwanted websites while allowing the rest. This is one way to use Pluckeye. However, there is also a more restrictive version. This allows you to block all websites except those that you explicitly allow. Let’s take a look at how this works.
Block everything except…
For some users, it may be too unsafe to only block individual websites one by one. It can happen that you repeatedly stumble across unsafe sites and possibly relapse before you have adjusted the blocker. One option here would of course be to block all images except on sites that you explicitly allow. Then at least I wouldn’t be able to see any images if I stumbled across a pornographic website.
For this reason, we can make Pluckeye more safe. This is done by blocking all sites except those that are explicitly allowed. There are two very similar ways of doing this.
Option 1: block text/
The command pluck + block text/ blocks all websites. If you only use this command, you will no longer be able to use the internet. You can now decide which sites you want to allow. We have already seen how to do this with pluck + allow. For example, if you only use the commands pluck + block text/ and pluck + allow lr-apps.de, you will be able to view this website, but no other sites.
Option 2: block otherwise
This option works in exactly the same way as above. Use allow to permit all sites that you consider safe and want to use. If you then enter pluck + block otherwise in the command prompt (cmd), all other sites will be blocked.
In both cases, you should think about which sites you need beforehand. I would also like to repeat the tip to use a short delay or no delay at all during setup. Otherwise, you may have to wait for a long time. After setup, I can then choose a longer delay.
No nasty surprises
Both methods have the advantage that there are no negative surprises. You don’t just stumble across unsafe sites, because you have only allowed those that you consider safe. At this point, I would like to point out once again that with pluck + allow, the entire site, including all images and videos, is allowed. If, for example, you want to allow wikipedia.org but block images and videos, there are two options. I have already mentioned the first one (by appending image/ or video/). A second option is to simply enter pluck + allow wikipedia.org text/html instead of allow. This has the same effect, but you only need one line.
Filter by time using Pluckeye
This is another very useful feature that demonstrates Pluckeye’s adaptability. You can not only block or allow websites entirely, but also restrict them to certain times. This can be very useful if a site is safe in terms of explicit content, but you still don’t want to waste too much time there. Let’s say, for example, that you only want to use Youtube between 12 p.m. and 3 p.m. There are two ways to do this:
1) Allow: pluck + when 12-15 allow youtube.com
2) Block: pluck + when 0-12,15-24 block youtube.com
I would like to briefly note for English-speaking users that this is a regional time specification. In many European countries for example, we use the 24-hour clock system. So 10 a.m. is 10:00, but 10 p.m. is 22:00. So in the example above, the 15 means 3 p.m.
Both have the same effect. Incidentally, I can also block the entire Internet connection. If I want to block the Internet between 10 p.m. and 6 a.m. the next morning (or 22:00 to 06:00), I write pluck + when 0-6,22-24 block everything. However, you should consider this step carefully, as you can only reverse it after the delay. If I have this command and then spontaneously want to look something up on the internet at midnight, it is not possible. This command also blocks the Internet connection for all programs, not just browsers.
Finally, I would like to point out a few additional tips and tricks. We have already learned the most important ones. But Pluckeye can do much more.
Block words and phrases with flee
One of the best features of Pluckeye is that we can use it to block not only websites, but also individual terms. This is done with the command flee. The command structure is pluck + flee word term. The word must always be included, while term is only a placeholder here. We can also use combinations of words (e.g., first and last names of porn actresses).
Let’s take the following example:
pluck + flee word Michael Jordan
Pluckeye now checks every page that is not explicitly allowed to see if Michael Jordan appears anywhere on the page. If this is the case, the page is blocked and we cannot visit it. Michael Jordan was just an example, of course. I would not recommend this command to basketball fans in particular.
However, the command does not work with pages that I have allowed using pluck + allow. Let’s assume I have the following two commands:
pluck + allow nba.com
pluck + flee word Michael Jordan
Then nba.com will not be blocked, even if the name Michael Jordan appears there. However, the flee command is very useful for websites that you have not specifically allowed and where you do not know exactly what to expect.
Block programs with Pluckeye
We can block not only websites, but also other critical programs on the computer. However, not the entire software is blocked, only its Internet access. This can be useful if a software provides an internal browser. To do this, you need to know the name of the software (which you can find out via the Task Manager, for example) and, if necessary, the file path. If you want to block a program called test.exe, type
pluck + block program test.exe
You can also insert the exact path of the program before the file name to make things even more safe.
Feature nhb
This builds on the software blocking described above. The command pluck + nhb automatically blocks Internet access for programs that the Pluckeye developers classify as potentially unsafe. This command can be very helpful for those who want to be cautious. It is comparable to the scenario described above, where you don’t have to block everything manually and experience fewer or no nasty surprises (block text/ or block otherwise).
Feature safe/safer
The command pluck + safe forces a safe search in search engines. If you write safer instead of safe, the whole thing becomes even more safe. This way, you cannot disable safe search in Google in your browser, even if you try.
Another interesting command is pluck + safeyoutube. This allows to block YouTube videos with erotic content.
Avoid resetting the computer using Pluckeye
If you want to bypass Pluckeye by simply resetting your PC and starting from scratch, you can prevent this with pluck + norecovery. With this command, pluck + system, pluck + nhb, and a long delay, the blocker is then almost impossible to bypass. I would even go so far as to say that it is impossible.
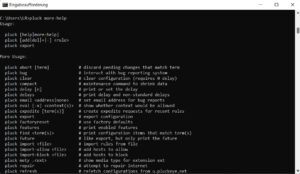
You can find many more useful command on the developer’s website or by entering pluck more-help in the command prompt (cmd).
Conclusion
Pluckeye is the most effective and versatile porn filter I have ever tried. In this article, I have provided instructions that I hope are helpful and easy to understand.
You can also find out about new features and other commands on the developer’s website linked above. There is also a smartphone app from Pluckeye. However, I have not tried it yet and therefore cannot write instructions for it. If you have any questions about this software and its functionality, please feel free to contact me directly by email at info@lr-apps.de.
1 Comment
How to prevent Windows Recovery | LR Apps · 27. February 2026 at 10:59
[…] second option is simpler and can be reversed after a while. This involves the Pluckeye software. It is designed to filter or block websites. It is particularly useful for protecting children or […]